Having a baby is hard. The emotions, the pregnancy, the anticipation, all of it. It's a super stressful time yet worth every penny. One of the stressors, albeit minor and short-lived, is notifications to family and friends. Everyone wants to be the first to know the news on the day of the arrival. Your options are to call everyone, text everyone individually, or the dreaded group text message. On our big day, I didn't want to do any of those so instead I used a bot to do it for me!
In this tutorial we will walk through the process of using the Python web framework Flask and Twilio, an SMS platform for developers, to send individual SMS messages to each of our friends and family. We'll also use an HTTP tunneling service, NGROK, which will publicly expose a small Flask app running on a Raspberry Pi.
Let's get started!
We'll need the following:
- A Twilio account and phone number. This tutorial requires a paid account, but I'll indicate changes you can make to use a free account.
Twilio
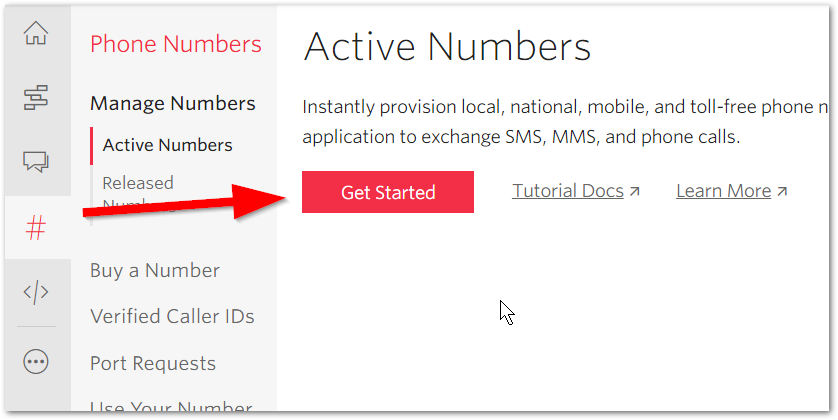
Go to twilio.com and create an account. Ignore all of the starter-guide prompts/pages and navigate to your dashboard. On the menu on the left hand side, click the number/hash icon and then 'Get started' to get your Twilio phone number. It should look like this:
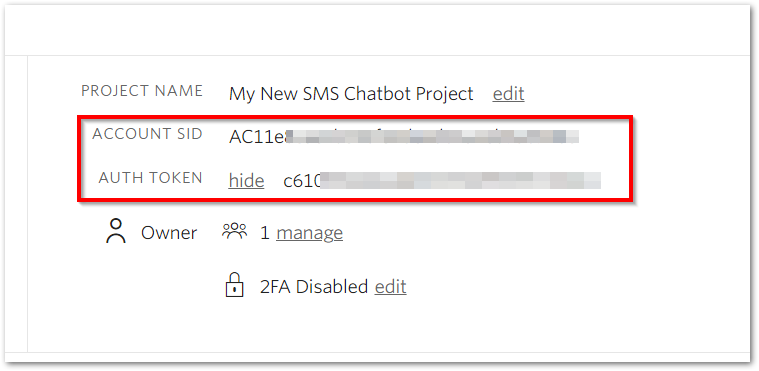
Then navigate to the dashboard and get your account SID and auth token:
Free trial accounts on Twilio require that you verify phone numbers you send messages to, so go to the numbers menu and add your personal cellphone to the verified caller IDs.
Now fire up your console and pip install twilio to download the Twilio python library and then give it a test to make sure your Twilio account and number is working:
>>>from twilio.rest import Client
>>>client = Client('YOUR_ACCOUNT_SID','YOUR_AUTH_TOKEN')
>>>client.messages.create(body="Hello from terminal",from_='+YOUR_TWILIO_NUMBER',to='+YOUR_PERSONAL_CELL')
<Twilio.Api.V2010.MessageInstance ..... >
You should receive a Twilio MessageInstance response and a text from your Twilio number. Since it's a free trial account, you're only allowed to send message to verified phones and your message will always be prepended by 'Sent from your Twilio trial account - '
On to Flask
Looking at the Flask quickstart guide let's create our Flask application file, starting with the boilerplate code, adding the methods=POST piece since we'll need that later:
# babybot.py
from flask import Flask
app = Flask(__name__)

@app.route('/sms', methods=['POST'])
def hello_world():
    return 'Hello, World!'
In your terminal type EXPORT FLASK_APP=babybot.py or if you're on Windows, set FLASK_APP=babybot.py and then flask run
Navigate to http://127.0.0.1:5000/sms and you should see the text "Hello, World" in the browser.
Now remove return 'Hello, World' from the flask '/sms' route and replace it with our Twilio commands (and remember to include from twilio.rest import Client at the top of the file)
# babybot.py
from flask import Flask
from twilio.rest import Client
app = Flask(__name__)

@app.route('/sms', methods=['POST'])
def hello_world():
    client = Client('YOUR_ACCOUNT_SID','YOUR_AUTH_TOKEN')
    client.messages.create(body="Hello from Flask",from_='+YOUR_TWILIO_NUMBER',to='+YOUR_PERSONAL_CELL')
    return 'Flask msg sent!'
Relaunch flask run and navigate to http://127.0.0.1:5000/sms again and you should receive the message to your phone.
Recap
- We created a Twilio account, obtained a phone number, and retrieved our Twilio credentials.
- We installed the Twilio python pckage and previewed and tested our credentials by sending a message to ourself from the terminal.
- We created a Flask app, babybot.py, and tested sending the text message just by hitting the '/sms' URL in our browser.
This is all good and well, but there are a few things left to do. First we have to expose http://127.0.0.1:5000/sms to the outside world with ngrok, as our Flask app is only running on our local computer and we're not going to be lugging around our device and firing up a Flask server every time we want to send an update. Second, we have to add logic to send the message seperately to multiple recipients using a list or dictionary in Python. Finally, we have to figure out how to send updates on-the-fly without having to modify the code in our app.
ngrok
From their website, ngrok "...exposes local servers behind NATs and firewalls to the public internet over secure tunnels." It is tool used by developers to share their local projects on their device quickly with clients or peers without the hassle of traditional deployment. Head over to https://ngrok.com/download to download and install ngrok on your system.
With your Flask server still running (verify this by going to http://127.0.0.1:5000/sms and check to see if you received the text) open another terminal and enter ngrok http 5000 and you'll be given a publicly accessible ngrok URL:
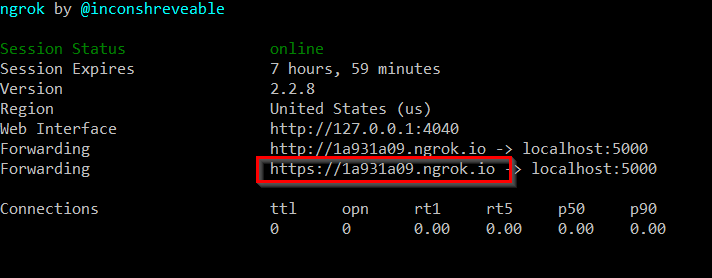
Enter this URL into your browser from any device and you should get the text message. Remember to add '/sms' like so: https://1a931a09.ngrok.io/sms
Multiple Recipients
To send the same text individually to multiple people, we'll modify babybot.py to iterate over a list of our phone numbers. Keep in mind that if you want to do this for real with your trial account, each number will need to be verified first.
Here's our updated code:
# babybot.py
from flask import Flask
from twilio.rest import Client
app = Flask(__name__)

@app.route('/sms', methods=['POST'])
def hello_world():
    client = Client('YOUR_ACCOUNT_SID','YOUR_AUTH_TOKEN')
    recipients = ['RECIPIENT_PHONE_NUMBER', 'OTHER_RECIPIENT_PHONE_NUMBER']
    for recipient in recipients:
        client.messages.create(body="Hello from Flask",from_='+YOUR_TWILIO_NUMBER',to=recipient)
    return 'Flask msg sent!'
If you want to give it a more personal touch and include a customized greeting, use a dictionary:
    recipients = {'Frank':'+FRANKS_PHONE_NUMBER', 'Jane':'+JANES_PHONE_NUMBER'}
    for name, number in recipients.items():
        client.messages.create(body='Hi {}.  Hello from Flask.'.format(name),from_='+YOUR_TWILIO_NUMBER',to=recipient)
    return 'Flask msg sent!'
On-the-fly
At this point, our body is hard-coded and our text messages have been a one-way conversation. If you try to text the number back, Twilio will reply "...Configure your number's SMS URL to change this message...." so that's what we're going to do! I want to be able to text my updates to this number, and then have that same message go out to all of my recipients. But first, we're going to modify our code so that it only sends out the text if I am the one that texted that number.
# babybot.py
from flask import Flask, request
from twilio.rest import Client
app = Flask(__name__)

@app.route('/sms', methods=['POST'])
def hello_world():
    client = Client('YOUR_ACCOUNT_SID','YOUR_AUTH_TOKEN')
    recipients = ['RECIPIENT_ONE', 'RECIPIENT_TWO']
    from_number = request.values.get('From', None)
    from_message = request.values.get('Body', None)

    if from_number == '+YOUR_PERSONAL_CELL':
        for recipient in recipients:
            client.messages.create(body=from_message,from_='+YOUR_TWILIO_NUMBER',to=recipient)
        return 'Flask msg sent!'
    else:
        return "Nothing to see here..."
In the code above, we included request from Flask and then with from_number and from_message we are getting the values when Twilio POSTs to our '/sms' URL. Then we check to see if from_number is equal to our personal cell phone and if it is, we send out the updates with the exact same message I texted my Twilio number.
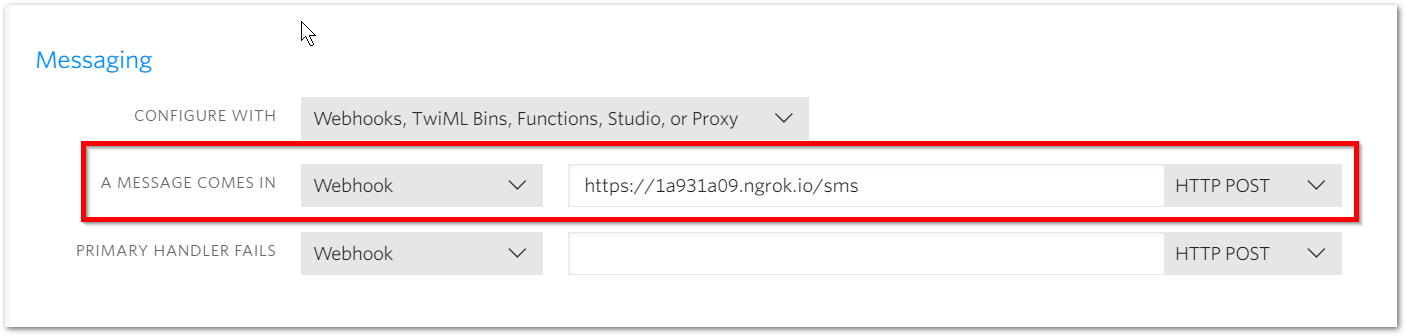
So we mentioned that Twilio will POST to this URL when I text my Twilio number. How do we do that? Back in your Twilio dashboard, click on the Phone Numbers menu. In the 'Active Numbers' menu, find your Twilio phone number and click it. Scroll down to Messaging, and replace the default example URL with the ngrok URL we created before:
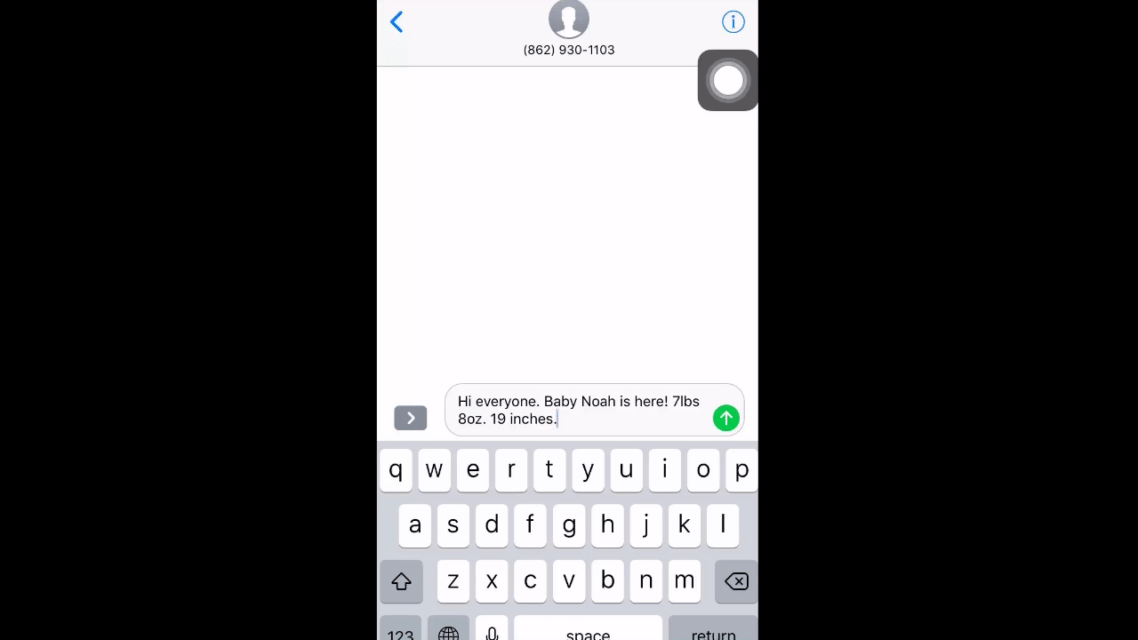
Now, go ahead and text your Twilio number back, and it will text each person individually, including yourself if you put yourself in the list/dictionary.
Now, replicate this on an old desktop PC or a Raspberry Pi so that your local server and ngrok tunnel will constantly run. Otherwise, the second you power down your laptop, the local server and ngrok tunnel shut down and your BabyBot updater fails.
Comments
comments powered by Disqus