My quick-and-dirty way to implement BabyBuddy with Home Assistant using a remote (or just about anything that can trigger an automation.). This assumes you already have some familiarity with the Home Assistant system and have Zigbee or Zwave remote buttons already set up.

1. Baby Buddy
Go to the Baby Buddy Github repo to read more about what it is. You can run it locally in Docker or click the "Deploy to Heroku" button to build it on Heroku and get your own publicly accessible instance of Baby Buddy.
Baby Buddy has a robust API using the OpenAPI Schema. You can explore yourself but I'll provide a brief use of it in the next step.
API Key
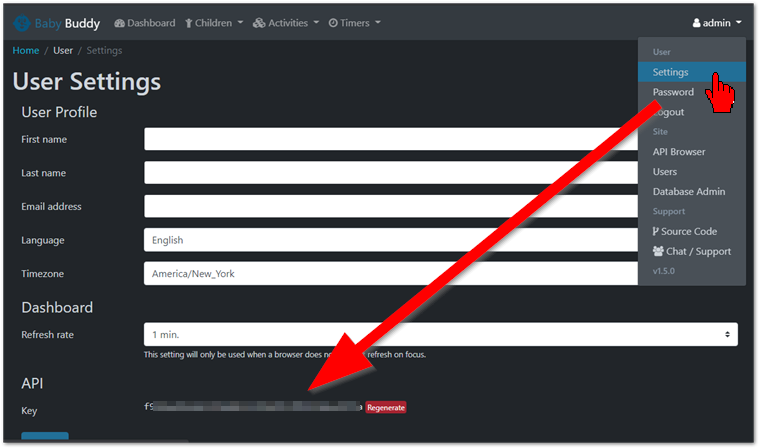
Once your Baby Buddy instance is up and running, go to your settings and grab your API key:
2. Home Assistant
We will be editing the configuration.yaml file and the automations.yaml file. If you're not familiar with creating automations with YAML files, read up on the documentation.
Let's start with the configuration. We're going to add two RESTful Commands to allow us to add diaper changes and feedings.
configuration.yaml
rest_command:
  pee_and_or_poop:
    url: "https://[YOUR_LOCATION].com/api/changes/"
    method: post
    headers:
      authorization: "Token [YOUR_API_KEY]" # w/o the brackets
    payload: '{"child":"3", "time":"{{ now() }}", "wet": "{{ wet_bool }}", "solid": "{{ solid_bool }}"}'
    content_type: "application/json"
  feedings:
    url: "https://[YOUR_LOCATION].com/api/feedings/"
    method: post
    headers:
      authorization: "Token [YOUR_API_KEY]"
    payload: '{"child":"3", "start":"{{ now() - timedelta(seconds=60) }}", "end": "{{ now() }}", "type": "{{ feeding_type }}", "method":"{{ feeding_method }}"}'
    content_type: "application/json"
As you can see we are making POST requests to the /api/changes/ and /api/feedings/ API endpoints. You need to get your Child ID. If you're running BabyBuddy locally via HTTP you will need to explicitly set verify_ssl to False and change the protocol to HTTP. Your authorization Token is better kept in a more secret location but I am not getting into that here. The payload includes the required data elements. We don't care about color of poop or ounces of formula, just when/how often it happens. For the solid, wet, type, and method you see I am using template variables so that I can fill these in later on with my automations.
Why the RESTful command and not the REST sensor? The RESTful command can be used in an automation. The REST sensor is more for regular, routine calls to an external application or web resource.
The Automations
Each button press triggers a separate automation. I'll show two examples here as to not clutter too much of the screen with YAML. It is much easier to do in the UI via Configuration > Automations > + Add Automation
automations.yaml
- id: '1627322188128'
  alias: Poopy Diaper
  description: ''
  trigger:
  - device_id: [YOUR_DEVICE_ID] # without the brackets
    domain: zha
    platform: device
    type: remote_button_short_press
    subtype: dim_up
  condition: []
  action:
  - service: rest_command.pee_and_or_poop # what we set up earlier
    data:
      wet_bool: 'False' # The variables we set up earlier
      solid_bool: 'True'
  mode: single
- id: '1627348975834'
  alias: Breast Milk
  description: ''
  trigger:
  - device_id: [YOUR_DEVICE_ID]
    domain: zha
    platform: device
    type: remote_button_short_press
    subtype: left
  condition: []
  action:
  - service: rest_command.feedings
    data:
      feeding_type: breast milk
      feeding_method: both breasts
  mode: single
At this point we have sent data to our BabyBuddy instance. Great...but what now? Let's get some of the data out of it now. For this we have a couple of options.
- The BabyBuddy-HomeAssistant integration via HACs in Home Assistant.
- Getting the data ourselves with a REST sensor in Home Assistant.
I'll demo the option of using a REST sensor as option # 1 is pretty self-explanatory.
Back in configuration.yaml add the sensors:
sensor:
  - platform: rest
    scan_interval: 15
    name: BabyBuddy Changes
    resource: https://[YOUR_LOCATION]]/api/changes/?limit=20
    value_template: N/A
    json_attributes:
      - results
    headers:
      Authorization: 'Token [YOUR_API_KEY]'
This sensor automagically hits that API endpoint every 15 seconds and consumes/records the results (which are then accessible in other ways). Let's figure out what to do with the results (H/T to gist from sstratoti). Add the following template sensor to your configuration.yaml file. Note that if you already have other template sensors then you would just add from the indication commented below.
  - platform: template
    sensors:
      bb_todays_changes_count: # copy form here down if you already have template sensors
        friendly_name: Todays Changes Count
        value_template: >-
          {% set count = namespace(value=0) %}
          {% set total = namespace(value=0) %}
          {% set start_of_day = as_timestamp(as_timestamp(now())|timestamp_custom ("%Y-%m-%d 00:00:00.1", True)) %}
          {% set end_of_day = as_timestamp(as_timestamp(now())|timestamp_custom ("%Y-%m-%d 23:59:59.0", True)) %}
          {% for row in state_attr('sensor.babybuddy_changes', 'results') %}
              {% if as_timestamp(row.get('time'))|int > start_of_day|int and as_timestamp(row.get('time'))|int < end_of_day|int  %}
                  {% set count.value = count.value + 1 %}
              {% endif %}
          {% endfor %}
          {{count.value}} Change(s) Today
In your Lovelace UI you can add an entities card, where the Entity is sensor.bb_todays_changes_count:

In the screenshot below, I have a mix of REST sensors and the HACs integration, coupled with some date formatting using the relative_time helper attribute.

Comments
comments powered by Disqus